

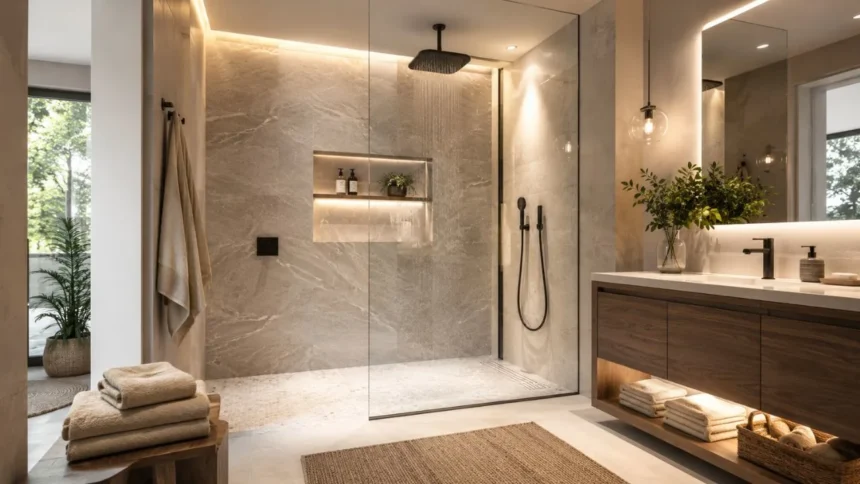
Walk-In Shower Ideas: Plan a Stylish and Practical Bathroom
Walk-in shower ideas can transform an ordinary bathroom into a brighter, more comfortable and visually open space. Unlike a traditional tub-and-shower combination, a walk-in design creates a dedicated showering area that may use a glass enclosure, partial screen, low curb or completely level entrance.
The best design depends on the bathroom’s dimensions, users and daily routines. A compact guest bathroom may need a corner shower with one glass panel, while a primary bathroom may have enough room for a doorless enclosure, built-in bench and multiple shower fixtures.
Appearance should never be considered separately from water control. The floor slope, drain position, waterproofing system, glass placement and showerhead direction determine whether the finished bathroom remains dry and easy to maintain. A stylish layout can become frustrating when water regularly escapes onto the floor.
This guide covers modern walk-in showers, curbless entrances, small-bathroom layouts, tile combinations, storage niches, benches, fixtures and wet rooms. It also explains accessibility, waterproofing, ventilation and common planning mistakes to consider before beginning a bathroom renovation.
What Is a Walk-In Shower?
A walk-in shower is a dedicated showering area that can be entered without stepping into a bathtub. It may have a low curb, completely level entrance, glass door, fixed screen or open doorway, depending on the room and the amount of water containment required.
The term does not automatically mean that the shower is doorless or accessible. Some walk-in showers still have raised thresholds and hinged or sliding doors. A curbless shower is a specific walk-in design in which the shower floor meets the surrounding bathroom floor without a raised barrier.
Walk-in showers are popular because their glass panels and open sightlines can make bathrooms feel more spacious. They can also simplify entry compared with climbing over the side of a bathtub, although their safety and accessibility depend on entrance height, floor grip, dimensions and fixture placement.
Before removing a bathtub, consider how the household uses the bathroom. Families with small children may still need a tub, while people planning to remain in the home long term may place greater value on a spacious shower with a bench, handheld sprayer and level entrance.
Plan the Layout First
Begin by measuring the complete bathroom rather than only the area where the shower will sit. Record the positions of doors, windows, toilets, vanities, radiators and existing plumbing. The shower entrance must remain easy to approach without interfering with drawers, doors or walking routes.
Decide whether the enclosure will occupy a corner, alcove or full-width section of the room. Alcove showers use three existing walls and often contain water efficiently, while corner showers can preserve more floor space. A large bathroom may support an open shower zone extending across one end.
Place the shower controls where they can be reached before the user stands beneath the water. This small decision prevents someone from being sprayed with cold water while adjusting the temperature. The handheld sprayer, niche and towel location should also relate to the user’s natural movements.
A bathroom floor plan should support drying as well as showering. Better Homes & Gardens recommends considering a drying area when planning a walk-in shower so water remains controlled and users have enough room to move comfortably after washing.
Small Walk-In Shower Ideas
Walk-in shower ideas for small bathrooms should reduce visual barriers while containing water effectively. Clear glass allows the eye to see the complete room, helping the shower feel like part of the floor plan rather than a separate enclosed box.
Use an alcove or corner that already contains plumbing when possible. A fixed glass screen may require less clearance than a swinging door, while a sliding enclosure can work when the toilet or vanity leaves insufficient room for a hinged panel.
Continue similar colours across the shower and surrounding walls to create visual continuity. Pale tiles, narrow grout lines and an uncluttered glass panel can make a compact bathroom feel calmer, although darker tiles can still work when lighting and contrast are planned carefully.
Small bathrooms can accommodate minimalist, colourful or traditional walk-in showers. Recent design examples use clear enclosures, bold fixtures, natural light and controlled tile combinations to create open-looking showers without depending entirely on white surfaces.
Try a Doorless Walk-In Shower
A doorless walk-in shower removes the need to open, close and clean a glass door. It can create a streamlined appearance and an easy transition between the shower and bathroom, particularly when the enclosure uses one fixed glass panel.
The shower must be sufficiently deep or carefully screened to prevent spray from reaching the vanity, toilet and doorway. Positioning the showerhead away from the opening can improve containment, while a wider glass panel may catch water that would otherwise escape.
Open showers can feel cooler because warm air is not trapped inside a complete enclosure. A rainfall showerhead, heated floor or more enclosed glass arrangement may improve comfort in cold climates, but each addition should be evaluated against the renovation budget and energy use.
Doorless designs are available in small and large bathrooms, but the word “open” should not mean unplanned. Houzz highlights doorless and open-concept layouts as popular possibilities while also showing that glass position, shower depth and room configuration vary considerably between successful projects.
Use a Curbless Entrance
A curbless shower, also called a zero-entry shower, has no raised curb separating the shower floor from the bathroom. This creates a continuous surface that can look modern and reduce a common tripping or access barrier.
The floor structure may need modification so the shower can slope toward the drain while remaining level at the entrance. This work is easier to plan during new construction or a major renovation than after the surrounding floor has already been completed.
Water containment requires precise design because there is no curb to stop water moving outward. The drain, floor slope, showerhead position and glass screen must work together, and the surrounding bathroom may need a broader waterproofed area.
Curbless does not automatically mean fully wheelchair accessible. Residential owners seeking accessible design should consult qualified professionals and local requirements. The 2010 ADA Standards specify at least 30 by 60 inches for a standard roll-in shower in covered facilities, but private-home codes may differ.
Add Frameless Glass
Frameless glass helps a walk-in shower feel open because it uses minimal visible metal around the panels. It allows decorative tile, stone and fixtures to remain visible and can connect the shower visually with the rest of the bathroom.
A fully frameless enclosure usually requires thicker glass and accurately aligned walls. The installation surface must support the hardware, and doors need enough clearance to swing safely without striking a vanity, towel rail or nearby fixture.
Fixed glass panels are simpler than complete glass enclosures and work particularly well in doorless designs. A single panel can contain the main spray while preserving an open entrance, although its width and position should be determined by actual shower dimensions.
Clear glass maximises openness but displays water spots and soap residue readily. Fluted, frosted or patterned glass offers more privacy and may disguise some marks, though it reduces the uninterrupted view that makes frameless walk-in showers appear especially spacious.
Explore Walk-In Shower Tile Ideas
Walk-in shower tile ideas can establish the bathroom’s complete design direction. Porcelain and ceramic tiles offer extensive choices in size, colour and pattern, while natural stone creates individual variation but may need more specialised care and sealing.
Choose floor tile according to wet-area suitability rather than appearance alone. Smaller tiles create more grout lines and can follow a sloped shower base easily. Large floor tiles may require careful cutting or a linear-drain layout to maintain the correct slope without uneven edges.
Use contrast to define the shower without making the room feel disconnected. A patterned floor can sit beneath plain wall tile, while a feature wall may combine with a quieter floor. Repeating one colour outside the enclosure keeps the design visually connected.
Current walk-in shower examples include marble-look surfaces, Zellige-inspired finishes, mosaics, hexagons and classic subway tile. The strongest results balance decorative impact with cleaning, slip resistance, grout maintenance and the scale of the bathroom.
Use Large-Format Tile or Slabs
Large-format tile creates fewer grout lines and can give a modern walk-in shower a clean, expansive appearance. It is particularly effective when the same material continues across several walls, allowing the enclosure to feel calmer and less visually divided.
Fewer grout joints can simplify routine cleaning, but larger tiles require flat, properly prepared walls. Uneven surfaces may cause edges to sit at different heights, and heavy pieces need suitable adhesives, handling methods and professional installation.
Porcelain or engineered wall panels can create the look of stone without requiring numerous small tiles. Full-height slabs produce a luxurious appearance, although access, cutting, weight, material cost and replacement difficulty should be reviewed before ordering.
Large-format finishes do not remove the need for a waterproofing system behind the visible surface. Tile and grout are decorative wear layers, while the underlying shower assembly must control moisture and connect correctly around corners, drains, valves and pipe penetrations.
Include a Shower Bench
A walk-in shower with bench seating offers a convenient place to sit, wash, shave or store products temporarily. It can also support people who become tired or unsteady while standing, although a decorative bench is not automatically designed as an accessible transfer seat.
A built-in bench can be tiled to match the walls, producing a permanent architectural appearance. The horizontal surface must slope slightly so water drains instead of collecting against the wall or remaining beneath bottles.
A floating bench makes the floor easier to see and may help a smaller enclosure feel more open. Its support needs to be planned before the walls are finished because the seat must safely carry the expected load without damaging waterproofing.
A removable teak or water-resistant stool offers greater flexibility and can be replaced easily. It still needs enough surrounding space to remain stable, and users should select a product intended for wet areas rather than placing ordinary indoor furniture inside the shower.
Build Useful Shower Niches
A recessed shower niche keeps shampoo and soap away from the floor while maintaining clear sightlines. It can be positioned vertically for several shelves or horizontally to serve multiple users across a wider shower wall.
Plan the niche around the products the household actually uses. A narrow opening may not hold tall pump bottles, while an oversized niche can become a cluttered display. Measuring common containers before construction helps establish practical shelf heights.
Keep the niche away from the strongest direct spray when possible. The base should slope outward so water drains, and every corner must be integrated carefully into the waterproofing system rather than treated as a decorative opening cut into finished tile.
Lighting can turn a large niche into a design feature, but electrical components must be approved for the location and installed according to applicable rules. A simpler contrasting tile, stone shelf or matching grout detail can create visual interest without additional wiring.
Choose the Right Shower Fixtures
A rainfall showerhead creates a gentle overhead flow and contributes to a spa-inspired appearance. Its position should suit the user’s height and the shower dimensions, and the household should confirm that the plumbing system can provide adequate pressure and hot-water capacity.
A handheld sprayer improves flexibility for washing hair, cleaning the enclosure, bathing children and assisting someone seated on a bench. Installing it on an adjustable rail allows different users to change its height rather than depending on one fixed position.
Dual showerheads can make a large enclosure comfortable for two people, but simultaneous use increases water and hot-water demand. The drain and supply system should be sized for the selected fixtures rather than designed around a single standard showerhead.
Place controls near the entrance so users can start the water without stepping into the spray. In accessible showers covered by ADA standards, controls, grab bars and spray units have defined placement requirements, demonstrating why fixture position should be planned before tiling begins.
Combine a Shower and Tub
A walk-in shower with tub can place a freestanding bath and open shower inside one waterproofed zone. This arrangement is often called a wet room and can give a primary bathroom a unified, spa-like layout.
Combining the fixtures may save visual space compared with placing them in separate enclosed areas. A glass panel can separate the wet zone from the vanity while allowing the tub and shower to share tile, lighting and decorative materials.
The tub’s exterior and the narrow spaces around it must remain accessible for cleaning. Consider how users will reach the taps, enter the bath and dry the floor rather than arranging the fixtures only for a dramatic photograph.
Wet rooms require careful drainage, waterproofing and ventilation because a larger section of the bathroom may receive spray. Better Homes & Gardens notes that poor drainage can cause pooling, while advanced waterproofing and ventilation requirements can increase installation complexity and cost.
Bring In Natural Light
Natural light can make a walk-in shower feel larger and reveal the colour and texture of its finishes. A nearby window, skylight or glazed exterior wall can reduce the enclosed feeling created by deep shower alcoves.
Privacy must be planned carefully. Frosted glass, high windows, exterior screening and suitable window treatments can admit daylight while limiting views. The level of privacy should be checked after dark when interior lights make the bathroom more visible from outside.
Any window located inside the wet area needs moisture-resistant detailing. The sill should direct water away, and the waterproofing must connect correctly around the complete opening rather than relying only on grout or interior paint.
Artificial lighting remains important even in a bright bathroom. Recessed wet-location fixtures, niche lighting and general bathroom illumination can reduce shadows, improve visibility and make the shower safer to use during early mornings and evenings.
Add a Modern Colour Scheme
White, cream and pale grey create a bright foundation for modern walk-in shower ideas. These shades work well with clear glass and can be warmed through timber cabinetry, brass fittings, textured towels or natural-looking floor tile.
Dark tile can create a dramatic enclosure, particularly when combined with good lighting and contrasting grout or fixtures. Charcoal, deep green and black surfaces may show mineral marks differently from pale tile, so test samples with the local water conditions in mind.
Earthy shades such as sand, clay, taupe and muted olive can produce a softer spa-like atmosphere. Stone-look porcelain, warm wood and brushed metal can support this direction without making the bathroom depend on one short-lived colour trend.
The shower can lead the design of a modern bathroom through its material or fixture choice. Houzz identifies the shower as a natural focal point and highlights options ranging from subway tile to marble-look slabs and rainfall fixtures.
Plan Drainage and Waterproofing
A walk-in shower depends on a continuous waterproof assembly beneath its decorative surface. The system should connect the walls, floor, corners, curb or entrance, drain, bench, niche and plumbing penetrations so water cannot reach vulnerable building materials.
Choose between a centre drain and linear drain according to the floor structure and tile plan. A centre drain normally requires the floor to slope from several directions, while a linear drain can support a single-direction slope that may suit larger tile.
The drain must be positioned and sized as part of the complete water-control plan. Proper drainage protects the structure and reduces standing water, odours and moisture problems; it should not be treated as a finishing detail selected after tile installation begins.
Use an experienced bathroom professional and follow the selected manufacturer’s complete installation system. Mixing incompatible components or puncturing a finished membrane can weaken the assembly. A water test before installing the final surface can help identify leaks while repairs remain possible.
Improve Bathroom Ventilation
Every walk-in shower adds moisture to the bathroom air. Without suitable ventilation, condensation can remain on walls, ceilings, mirrors and window frames, increasing the likelihood of recurring dampness and mould growth.
Use a properly sized exhaust fan that removes moist air to the exterior rather than releasing it into an attic or roof space. The U.S. Department of Energy warns that exhausting bathroom moisture into an attic or crawl space can contribute to mould and rot in building materials.
Run the fan during showering and long enough afterward for surfaces and air to dry. The EPA also recommends using a bathroom fan or opening a window when showering as part of household moisture control.
Ventilation cannot correct a plumbing leak or failed waterproofing system. Investigate recurring stains, loose tile, soft flooring or persistent mould rather than assuming the fan is the only problem. Water entering the structure needs to be stopped at its source.
Make the Shower Easier to Clean
Choose finishes with realistic maintenance requirements. Highly textured tile, numerous grout joints and complicated ledges can add character but may require more frequent scrubbing than broad smooth surfaces and simple shelves.
Use a handheld sprayer or nearby cleaning attachment to rinse walls and glass. A squeegee stored within reach can reduce water spots and soap residue when used after showering, particularly on large clear glass panels.
Keep bottles inside a niche or on a removable shelf rather than placing them across the floor. Fewer loose objects make it easier to rinse the shower and allow surfaces to dry more completely between uses.
Good drainage and ventilation are essential parts of maintenance. The EPA advises fixing water problems promptly, drying surfaces and improving ventilation when bathroom mould repeatedly returns.
Plan an Accessible Shower
An accessible walk-in shower should reduce barriers and support users with different strengths, mobility levels and balance needs. A level entrance, sufficient clear space, stable seating, handheld shower and thoughtfully positioned controls can improve usability.
Install structural reinforcement before closing the walls if grab bars may be needed now or later. Reinforcement allows secure bars to be added without relying on tile or wallboard that was never designed to carry a person’s weight.
Select a slip-resistant wet-area floor and ensure the entrance remains clear. A loose rug placed immediately beside a level shower can create another hazard, so the drying area and floor finishes should be considered as part of the same safety plan.
Commercial and public facilities must follow applicable accessibility standards. ADA guidance specifies dimensions, clearance, seats, controls and grab-bar locations for compliant shower compartments, while homeowners should consult local codes and an accessibility specialist for residential planning.
Control the Renovation Budget
Begin with a written scope covering demolition, plumbing, waterproofing, tile, glass, fixtures, lighting, ventilation and finishing work. A complete scope makes contractor estimates easier to compare and reduces the likelihood that necessary components appear later as unexpected additions.
Keeping the shower near existing supply and drainage lines may reduce structural and plumbing changes. However, saving money by accepting a poor layout or unsuitable drain position can produce ongoing water-control problems that cost more to correct later.
Use a combination of investment and budget materials. A feature wall can use premium tile while the remaining walls use a coordinated standard product. A fixed glass panel may cost less than a complete custom enclosure while still creating a modern appearance.
Do not reduce waterproofing, floor preparation or ventilation to afford decorative upgrades. These hidden systems protect the building long after colours and fixtures have changed. Allocate a contingency for concealed damage, uneven framing or plumbing problems discovered after demolition.
Avoid Common Design Mistakes
The first mistake is creating an open shower that is too shallow. Water may spray beyond the glass and leave the bathroom floor wet after every use. Test the likely spray direction and provide enough depth, screening and drainage before finalising the layout.
Another mistake is designing storage after the walls are complete. Bottles then collect on the floor or require hanging organisers that interrupt the intended appearance. Plan niches, shelves and bench dimensions alongside the plumbing and waterproofing.
Do not choose floor tile based only on colour. Wet-area suitability, texture, drainage slope and grout maintenance affect everyday safety and cleaning. A highly polished finish may look luxurious but be unsuitable for the shower floor.
Finally, avoid hiring different trades without confirming who is responsible for the complete waterproof assembly. The installer, plumber, tiler and glass contractor must work from one coordinated plan so penetrations, drains and finished edges do not weaken the system.
Conclusion: Balance Style With Water Control
Walk-in shower ideas range from compact glass enclosures to large doorless wet rooms. The right choice depends on the bathroom size, household needs, preferred style and amount of privacy, seating and storage required.
Plan the floor layout before selecting tile or fixtures. Decide how users will enter, start the water, reach products and dry themselves. Clear movement and practical storage will remain important long after decorative trends change.
Treat drainage, waterproofing and ventilation as essential design elements rather than hidden technical details. A carefully installed enclosure should direct water toward the drain, protect surrounding materials and allow moisture to leave the room efficiently.
A successful walk-in shower combines attractive materials with safe access, comfortable fixtures and manageable cleaning. When the layout and construction are resolved first, glass, tile, lighting and colour can create a bathroom that remains stylish and functional for years.
Frequently Asked Questions
What is the best walk-in shower for a small bathroom?
A corner or alcove shower with clear glass usually preserves the most visual space. A fixed panel or sliding door can also prevent a swinging door from interfering with the toilet or vanity.
Can a walk-in shower be completely doorless?
Yes, but the enclosure needs enough depth, suitable glass placement and correctly positioned fixtures to contain spray. Open showers may also feel cooler than fully enclosed designs.
Is a walk-in shower the same as a curbless shower?
No. A walk-in shower may have a raised curb, while a curbless shower has a level or nearly level entrance. Curbless construction requires careful floor sloping, drainage and waterproofing.
What tile is best for a walk-in shower floor?
Choose tile rated for wet floors with suitable slip resistance. Small mosaics are popular because their grout lines add grip and allow the tile to follow the shower’s drainage slope.
Does a walk-in shower need a glass panel?
Not always. A sufficiently large shower can be completely open, but many layouts need a fixed or partial panel to keep water away from the vanity, toilet and bathroom entrance.